• There were many reasons for the change of the site software, the biggest was security. The age of the old software also meant no server updates for certain programs. There are many benefits to the new software, one of the biggest is the mobile functionality. Ill fix up some stuff in the coming days, we'll also try to get some of the old addons back or the data imported back into the site like the garage. To create a thread or to reply with a post is basically the same as it was in the prior software. The default style of the site is light colored, but i temporarily added a darker colored style, to change you can find a link at the bottom of the site.

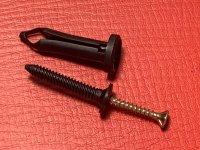
Any suggestions on Plastic rivets removal?

scwingman

Member
2021 RT

Purchased some lights from TricLED and it requires removing the 4 screw rivets on the saddle bags.

Any suggestions on how to get these out. The screw just turns???

Thanks for any help or suggestions

SCWingman
 
Last edited by a moderator:
RICZ is correct, they are not screws per say but just look like screws. A tiny flat screwdriver or an o-ring pic will lift them enough to remove the whole pin. Some say to throw away the plastic screw looking pin and to replace it with a real screw about the same size for easy removal next time.
 
Yesterday I removed the same. Screw turned out than I pulled it out with a needle nose pliers. Next pulled the rivet out. It went fine.
Jim
 
The screw-type (cross-point center) needs gentle backing out for it to come out enough to grab.
The flat center type needs the center cap lifted up at least 1/2 way then lift out the rivet body.
They are reusable to a point but amazon home depot or lowes sell them cheap.
 
I've just had my first encounter with the famous plastic rivets around the saddlebags.

At first, I wondered what all the fuss was about as the first 3 came out easily. But then I tried the fourth!!

It just turned round and round, so I ended up drilling a tiny hole in the centre pin and screwing a small metal woodscrew into it (to about 1/4" depth). That gripped really well so then I was able to simply grab the woodscrew in some long nose pliers and pull everything out just fine (no turning needed).

That worked so well that I think I will just pre-drill a similar hole in all the centre pins and put them back in place like that. If any should prove a problem in the future, I believe the same trick will work (though I might also use cbredneck's tip too, for backup).

I do hope the person who invented these particular rivets - AND the people who specified them for use on the Spyder - have all been fired!

pushpin rivet removal.jpg
 
I replaced my pushpins with PlusNuts and stainless steel machine screws

While there are few "screw" type pushpins (eg, on evap pre-filter) on my 2014 RT-S, I don't like pushpins in general and continued my replacement of Torx (and many hex) machine screws with M5 and M6 flanged button-head stainless steel hex drive machine screws which I carried over to pushpins. Stainless steel is easy to see in dark corners. Hex drive allows the use on ball end wrenches. And replacing the pushpins means I only need two tools rather than three.

To replace the pushpins I used pre-bulbed rivet nuts (aka PlusNuts) that are appropriate for thin material. You will need the Astro Pneumatic extra long LM5M and LM6M mandrels to set the nuts. From my perspective a truly great improvement for working on my Spyder.
 
I like the plastic rivets for the ease of removal and reinstallation vs. nuts & bolts. If a 'screw' type becomes hard to back out, just use a thin metal screw (sheetrock 1 in?) in it's place.
 
Plastic pop pin removal

I have used all suggestions, I find a inexpensive tack removal tool works best. D-Daddy
 
Back
Top