• There were many reasons for the change of the site software, the biggest was security. The age of the old software also meant no server updates for certain programs. There are many benefits to the new software, one of the biggest is the mobile functionality. Ill fix up some stuff in the coming days, we'll also try to get some of the old addons back or the data imported back into the site like the garage. To create a thread or to reply with a post is basically the same as it was in the prior software. The default style of the site is light colored, but i temporarily added a darker colored style, to change you can find a link at the bottom of the site.

Getting to F3 Spyder Battery

I am curious as to how to get to the F3 battery. I looked at the owners manual and it looks like you have to lift out the frunk box, but it is not really clear about how to do it. I see that there are several (four, I think) fasteners that I presume hold it in place. Just how do I go about removing them; I have not seen fasteners like this before and I don't want to break something. Someone I follow on YouTube said just use a screwdriver or diagonal cutters to pull them out, but I thought I would run this by the in-house experts here. Thanks, folks.:pray:
 
Last edited by a moderator:
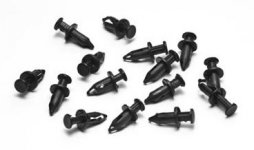
You can use a screwdriver. There are 4 fasteners, just pull the center out and then pull the outside part out of the hole. They may come out in one piece. You will also need to remove the black panel below the headlights to lift the frunk bucket out.
 
Last edited by a moderator:
How to get to the F3's battery:

1. pop the hood.
2. remove the bat-looking plastic cover that has a computer sign on it by pulling straight up on two lower corners
3. use flat-head screwdriver to pop the center pins of the black plastic rivets
4. pull out the base of the plastic rivets
5. lift out the tub

To replace - reverse the procedure. The only problem you'll face is that bat-looking plastic cover with the computer sign on it. Yea, you'll need to apply some rubber-safe oil or a silicone grease to the rubber grommets on each side and on the matching plastic rivets on the cover. Holding the cover in place by the center with one hand apply pressure with another hand on each side pushing down and forward.

Good luck installing that plastic cover back :)
 
Last edited by a moderator:
Speedsterjohnny,

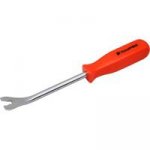
The fasteners you are referring to are called push pins, and I got this tool from Harbor Freight (Sears sells them too), and it works great for removing them. You can use a screwdriver to if you want, but this tool makes it so much easier for me.

image_16183.jpg

Push Pin Pliers
Item #67400
Only: $9.99
Compare to $19.99, Craftsman Craftsman
 
Last edited by a moderator:
I need to buy a set of those. The push pins are just too easy to lose using a screwdriver.
 
Last edited by a moderator:
I looked at the Harbor Freight push pin pliers and they all stunk. The jaws did not meet squarely and, amongst all the pairs on the rack there was no consistency in the quality of the jaws. I paid a bit more but got a good pair from Lisle.
 
R.e. Harbor freight pliers: yes, I bought a pair and then true up the surfaces with a file and India Stone. You have to Be careful with any plier or you can damage the pins. Watched a tech mangle some using his Mac Tool plier.

Wayne
 
I use this tool for removing the auto push clips that are on the Spyder
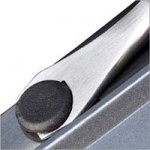
Place toll under the top of the center pin don't remove the center pin completely that way you want loose it, then place tool under the main larger body piece.

Removal tool.jpg Push pin Removal tool.jpg
 
Last edited by a moderator:
I use the Harbor Freight one and I think it works great. I bought one for both my sons and a friend, they all like them.
 
I use this tool for removing the auto push clips that are on the Spyder
Place toll under the top of the center pin don't remove the center pin completely that way you want loose it, then place tool under the main larger body piece.

View attachment 156917 View attachment 156918

And where did you get that tool?


While looking for something not related, I came upon this, and now all I need to do is find what I was looking for.

https://www.ebay.com/itm/Heavy-Duty...237455?hash=item33d5333e8f:g:aPgAAOSwFb5aAizG
 
Last edited by a moderator:
1. pop the hood.
2. remove the bat-looking plastic cover that has a computer sign on it by pulling straight up on two lower corners
3. use flat-head screwdriver to pop the center pins of the black plastic rivets
4. pull out the base of the plastic rivets
5. lift out the tub

To replace - reverse the procedure. The only problem you'll face is that bat-looking plastic cover with the computer sign on it. Yea, you'll need to apply some rubber-safe oil or a silicone grease to the rubber grommets on each side and on the matching plastic rivets on the cover. Holding the cover in place by the center with one hand apply pressure with another hand on each side pushing down and forward.

Good luck installing that plastic cover back :)

The bat-looking plastic cover removed easily with a gentle prod using a large flat blade screwdriver.... popped right off. I sprung for a push pin pliers at NAPA which was delivered same day from their distribution center. Advance Auto, Auto Zone and Home Depot all had to order, Home Depot referring me to the online source with no offer to order for me. The push pins came out easily and out came the tub. I did use a rubber safe lubricant, but had no problem putting it back on. The push pins were a little stubborn, but I managed to get them back in too.

The reason for this procedure was the installation of a power plate from Lamonster Garage. My only question, and I raised it with their tech by phone, was why it was mounted on the left (clutch lever) side when there seemed to be so much more room on the right. Oh well, it's on, it works and I'm happy. Thanks to all of you for your suggestions.

Hoss

 
Last edited by a moderator:
Back
Top