• There were many reasons for the change of the site software, the biggest was security. The age of the old software also meant no server updates for certain programs. There are many benefits to the new software, one of the biggest is the mobile functionality. Ill fix up some stuff in the coming days, we'll also try to get some of the old addons back or the data imported back into the site like the garage. To create a thread or to reply with a post is basically the same as it was in the prior software. The default style of the site is light colored, but i temporarily added a darker colored style, to change you can find a link at the bottom of the site.

Is removing 1330 Water pump simple? How to drain/bleed coolant?

USAF

Member
Hello, I am working on a friends 2021 Spyder RT Limited that is leaking coolant from the water pump housing. Looks to be coming from between the pump housing gasket. I know my way around motorcycles very well but have never removed a water pump on one of these. Before I proceed, I have a few questions.

Is this just a straightforward job or are there other parts that are going to also come out with the pump.

Also where is the drainage valve / and what is the bleeding procedure.

Thanks for your help !
 

Attachments

  • 20230704_130012.jpg
    20230704_130012.jpg
    62.2 KB · Views: 108
Last edited by a moderator:
Hello, I am working on a friends 2021 Spyder RT Limited that is leaking coolant from the water pump housing. Looks to be coming from between the pump housing to motor gasket. I know my way around motorcycles very well but have never removed a water pump on one of these. Before I proceed, I have a few questions.

Is this just a straightforward job or are there other parts that are going to also come out with the pump.

Also where is the drainage valve / and what is the bleeding procedure.

Thanks for your help !

If your thinking of Draining the radiator , pull the hose off ..... many folks have discovered the OEM drain often breaks off. ..... No warranty ?????? ...... Mike :thumbup:
 
Hello, I am working on a friends 2021 Spyder RT Limited that is leaking coolant from the water pump housing. Looks to be coming from between the pump housing gasket. I know my way around motorcycles very well but have never removed a water pump on one of these. Before I proceed, I have a few questions.

Is this just a straightforward job or are there other parts that are going to also come out with the pump.

Also where is the drainage valve / and what is the bleeding procedure.

Thanks for your help !

Why is this not being handled under warranty?
 
Step 1 -- review how important this friendship is to you. This is a 7 on a scale of 10 difficulty.

Step 2 -- buy a service manual and read the relevant parts. The pump is integrated with the thermostat and has many plastic parts then need proper torque.

Step 3 -- carefully and repeatedly loosen 1/4 turn then tighten the various pump-to-engine fasteners. Then cross your fingers or whatever.

It's my theory 1330cc water pumps have problems when the engine is revved over 4K before the 1st or 2nd bar shows on the instrument panel.
 
Last edited:
I believe its out of warranty, I was hoping this would be a simple job, I don't want to get in over my head here. Upon looking closer at the leak, It seems to be coming from the water pump housing it self, where it is seemed together. It looks like 2 parts to it.
 
I believe its out of warranty, I was hoping this would be a simple job, I don't want to get in over my head here. Upon looking closer at the leak, It seems to be coming from the water pump housing it self, where it is seemed together. It looks like 2 parts to it.

Have your friend spend the 25 bucks to get you the shop manual. But, double check on the warranty time, and make sure he didn't buy an extended warranty but may not recall that.

https://brpmanuals.com/product/2021...limited-series-repair-and-maintenance-manual/

As pointed out, one of the weird things is that the thermostat is embedded inside the water pump.

It doesn't help to know your way around motorcycles. It helps to know your way around Rotax engines. And what kind of leak rate are you guys talking about. A drop a minute vs a drop a day makes a difference over what to do about it. And look at Bert's post. it might not hurt to re-torque the casing. Just saying. Good luck.
 
It only leaks very little when ridden, More of a small seepage, Just enough to drip down the case a bit. I will try that retorque first that was suggested thanks.
 
Last edited:
.

I have removed and replaced the water pump Twice. Once because the thermostat failed ( in two pieces) and once because the one I purchased leaked no matter what I did. Later the shop said it was a BAD pump and got a good one for me under their parts warranty.

It no easy job to R and R the waterpump. Small hands help. Removing the hoses is a pain because of the clamps and their location. The small hose bung to the coolant tank is prone to breaking ( be careful)nojoke Ball hex wrenches are needed. Removing the Tupperware isn't to bad.

Good Luck---- consider letting the shop break parts and cut up their hands.

Lew L
 
Last edited:
1330 Water pump

:chat:...First off...the Water Pump is a real pistol of a repair job. I was thinking of doing this repair, but I let the Dealer have the 'fun'.

My Water Pump was done and covered by the Warranty. I hope you have a warranty plan.

Good Luck on Your Mission. ....:thumbup:
 
Last edited by a moderator:
When my 2022 was new in January, I had the exact same problem. (Photo attached). I didn’t want to haul it 2 hrs each way back to the dealer, so after checking on the price and availability of a new pump, I decided to try snugging up the bolts on the pump - just a bit more. The leak stopped!

May be worth a try.
 

Attachments

  • 23E0A007-D551-4D7A-8DD9-7E730885F2CB.jpg
    23E0A007-D551-4D7A-8DD9-7E730885F2CB.jpg
    43.5 KB · Views: 134
When my 2022 was new in January, I had the exact same problem. (Photo attached). I didn’t want to haul it 2 hrs each way back to the dealer, so after checking on the price and availability of a new pump, I decided to try snugging up the bolts on the pump - just a bit more. The leak stopped!

May be worth a try.

That looks to be the same issue he is having. I am going to try and do that over the weekend when he brings it over. How much more did you tighten up the bolts ? 1/4 turn ? I don't want to crack the plastic housing ! I will also try what was recommended with the loosen and retorque procedure.

Thanks !
 
Okay USAF -- you're getting a bit too casual here with a plastic part that is difficult to replace.

Reread my Step 2 -- get a service manual so you know the correct torque values.

As to why I say loosen 1/4 turn before tightening, BRP uses a thread locking compound (typically colored Yellow) which you must break loose before a correct torque value can be obtained. And I said repeatedly (I suggest a minimum of three) to clear the compound from the threads (if it was my water pump I'd remove the fastener completely and clean it with a thread chase).

Regarding a torque wrench I recommend a 1/4" calibrated digital torque wrench (which is what I use, they're not that expensive only $100).

Because if something goes wrong you will be reconsidering my Step 1.
 
If re-torquing doesn't solve the problem try the old fashioned remedy of Radiator Stop Leak. About 45 years ago I successfully sealed a crack in the aluminum engine block of a 1992 Datsun 1200! I put the stop leak in, covered the radiator, and went for a drive. When the engine was near boiling I stopped, yanked the cardboard from in front of the radiator, and quickly took off. The engine cooled and closed the crack. Never leaked again.
 
Reviving an older topic in an effort to clarify a few details.

As insight, our 2014 RTS SE6, began having temp fluctuations while idling. Fans operated normal. Then other times, all would be normal, we would stop and shut down for a few minutes. Upon restarting, the indicated temps crept up well above 1/2 way on the gauge, fans came on, temps kept increasing, fans blowing forward, but no heat was coming off radiators. Coolant level was adequate. Expected a failing thermostat.

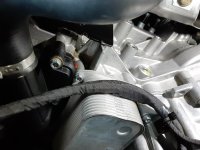
Removed a few body panels. Removed fasteners that mount computer and set it to the side without disconnecting wiring connectors.

Previously, I had removed the oem hose clamps, so disconnecting the hoses at the water pump spigots was easy. I drained the coolant via the already disconnected hoses.

So to clarify a few things posted previously.

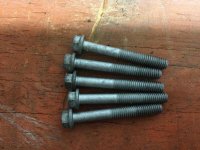
1) Regarding the fasteners securing the water pump to the engine case, none had thread locking compound on them.

2) Concern was previously mentioned regarding the thermoplastic water pump housing being damaged by over torquing the fasteners that secure the water pump. To clarify further, each of the water pump fasteners can not be tightened to damage the plastic. Each fastener has a metal crush sleeve that prevents damaging the plastic housing. Yes, you could overtighten and strip the case threads, but crushing the plastic is addressed with the crush sleeves.

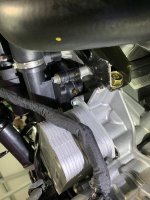
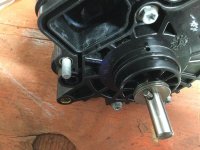
3) During removal, withdrawing the water pump from the engine case, use care as the plastic gear can slide off the water pump shaft. I did not have any issue with the gear dropping into the cases, not sure if it could be dropped, simply be aware.

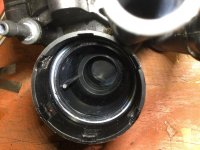
4) There are no paper gaskets, an O ring seals the water pump housing to the engine case. A preformed packing seals the water passages to the engine case.

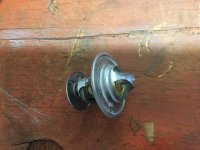
5) I did remove the thermostat. My goal was to hopefully replace just the thermostat. Unfortunately, the thermostat had no identifiable part number on it. A trip to NAPA, going thru every thermostat on their shelf found no match.

The thermostat is a typical 2.1” diameter type, 80*c, however the bypass plate diameter would not match anything I compared it too. The system utilizes the modern bypass design. Failing to use a bypass thermostat will cause overheating unless the pump housing is modified, and even that is no assurance if a non correct bypass style thermostat is tried.

So, a new water pump assembly is on its way. I know several folks mentioned replacement of the water pump was a difficult task to accomplish. My opinion found the task was straight forward and minimally difficult.
 
Thank you for this information -- not what I expected from other forum posts and reading service manual.

Simply a FWIW, photos of the oem bolts without thread lock compound, bypass style thermostat, metal crush sleeves in thermoplastic water pump housing and thermostat area of the water pump housing. Unfortunately the housings bypass port is difficult to see in the photo.
 

Attachments

  • BA093A98-4FF6-422F-8D24-1B4217667CB8.jpg
    BA093A98-4FF6-422F-8D24-1B4217667CB8.jpg
    79.9 KB · Views: 35
  • 305913EB-125F-47DF-A429-EDD5A06BCEB7.jpg
    305913EB-125F-47DF-A429-EDD5A06BCEB7.jpg
    65.5 KB · Views: 49
  • 331B74D8-AAFE-4447-BCD2-28AA1A189AF4.jpg
    331B74D8-AAFE-4447-BCD2-28AA1A189AF4.jpg
    63.3 KB · Views: 46
  • 0194E787-3FBA-4E26-B186-9E292BFF16C6.jpg
    0194E787-3FBA-4E26-B186-9E292BFF16C6.jpg
    68.3 KB · Views: 40
  • F45A18F0-DF38-49D9-B429-4AFD675375D4.jpg
    F45A18F0-DF38-49D9-B429-4AFD675375D4.jpg
    68.5 KB · Views: 39
Reviving an older topic in an effort to clarify a few details.

...

The thermostat is a typical 2.1” diameter type, 80*c, however the bypass plate diameter would not match anything I compared it too. The system utilizes the modern bypass design. Failing to use a bypass thermostat will cause overheating unless the pump housing is modified, and even that is no assurance if a non correct bypass style thermostat is tried.

So, a new water pump assembly is on its way. I know several folks mentioned replacement of the water pump was a difficult task to accomplish. My opinion found the task was straight forward and minimally difficult.

Thanks so much for this information. Very helpful to read info from folks who have done the job.

Very unfortunate that you couldn't find a thermostat option. I was helping someone who's thermostat "housing" had blown out. They were hoping to replace the thermostat and do some sort of plastic welding to seal it back up. they also couldn't find a compatible thermostat. It sucks that you have to order a whole housing which isn't cheap.

Thank you for this information -- not what I expected from other forum posts and reading service manual.

So for all your doom and gloom posts about this - have you never done it yourself? :dontknow:
 
Okay I gotta tug my forelock a little harder. I can do that ...:D

WRT to thread-locking compound, bad assumption on my part. Rereading the service manual, at the beginning of the Cooling System section Loctite is cited as a Service Product. But a more careful reading indicates the Loctite is not used for the water pump holddown screws but rather the water pump gears.

So I searched a bit further for more commonly replaced items and found:

CPS -- Loctite, unknown crush sleeve
CAPS -- no Loctite, crush sleeve
MAPTS -- no Loctite, no crush sleeve
HCM Filter -- no Loctite, crush sleeve

WRT thermostat, I didn't know it was removeable. As PMK noted it doesn't show in the parts catalog. I did note in PMK's photo there were stamped numbers on the thermostat rim. In my experience, BRP engine-related parts (eg CPS) have Bosch part numbers which respond to an internet search. Maybe if PMK can post another photo showing those numbers more clearly???

WRT task score, let's remember PMK is much higher on the mechanic skills scorecard than most of us.:D
 
Back
Top