• There were many reasons for the change of the site software, the biggest was security. The age of the old software also meant no server updates for certain programs. There are many benefits to the new software, one of the biggest is the mobile functionality. Ill fix up some stuff in the coming days, we'll also try to get some of the old addons back or the data imported back into the site like the garage. To create a thread or to reply with a post is basically the same as it was in the prior software. The default style of the site is light colored, but i temporarily added a darker colored style, to change you can find a link at the bottom of the site.

Just Installed Motorcycle Dave's gel pad

tntnj

Member
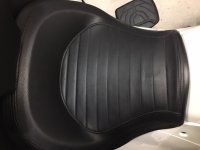
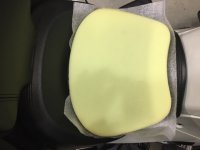
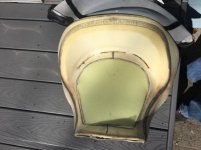
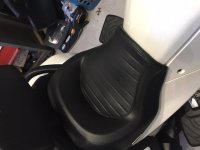
The gel pad makes a big difference on the bottom end and tail bone It took about 2 hours start to finish . It is very frighting cutting the pad to install the gel pad . But once you start there is no turning back . I bought an air stapler just to do the seat. The first picture is the before the last is with the gel pad installed. 1 to 10 10 being the hardest I would say a 5. ( the third picture has a shadow in the front of the gel pad )
 

Attachments

  • IMG_0308.JPG
    IMG_0308.JPG
    85.3 KB · Views: 133
  • IMG_0309.JPG
    IMG_0309.JPG
    72.2 KB · Views: 141
  • IMG_0313.jpg
    IMG_0313.jpg
    37.4 KB · Views: 144
  • IMG_0314.JPG
    IMG_0314.JPG
    75.7 KB · Views: 138
Great pictures, thanks for posting. I did the same modification several years ago and it really changed the ride, going from a two hour seat to an all day seat. I too bought an air stapler for this job. That first cut is a real heart stopper, but after that it is a great adventure. Hope you had as much fun doing yours as I did and get as many miles of enjoyment out of it as I have. Enjoy.:yes::yes:
 
I would gladly pay a good craftsman to install Dave’s gel pad in both “driver and passenger” in my seat “in the winter months” if that option was available. “I’d pay the shipping” Today it took me over a hour just to hang a picture on a wall! It’s hell to get old!
 
I would gladly pay a good craftsman to install Dave’s gel pad in both “driver and passenger” in my seat “in the winter months” if that option was available. “I’d pay the shipping” Today it took me over a hour just to hang a picture on a wall! It’s hell to get old!

Not having an adequate stapler, I inquired on both. I also checked locally, and no shops were interested in the work. Shipping there/back was about $70. Kit was $80. Labor was $100. I ended up going another route. If you have the tools, could be worth the cost
 
First of all I want thank you for your posts.
That hardest part of the process of installing the gel pad is getting over the fear of cutting the foam. I made a paper template of where I wanted the gel to be on the seat. I then cut the gel to size with the template. I then i found the center of the seat and made a line down it. Then placed the gel on the seat and traced it. The three lines in the back of the seat are where there are three plastic pieces that hold the back of the seat down(you want to leave room so they are not disturbed. On my seat I left the back part of the seat attached so it would line back up when I reinstalled the seat. I made vertical cuts and pulled the foam out by hand and used 120 grit sandpaper to level the foam. To get the right height of the foam I used the scrap pieces for the edges. once it is level you peel the back of the gel install in the opening . Next you spray glue on the seat and foam cover your work with the foam , trim it reinstall the seat DONE
 
What a great idea. I never thought of making the seat wider. Feels like sitting on your couch I bet.
 
Back
Top