Doc,
I'll take a guess - PK, you correct me if I'm off base.
The isolator is effectively making the oem spring into 2 separate springs. You do this by inserting a devise between 2 coil windings of the spring and this devise locks the distance between these two coil windings so it doesn't allow these coils to compress. By reducing the effective length of the oem spring, the 2 new shorter springs will each be stiffer than the oem spring.
It matters where you place the isolator. If you place the isolator exactly in the middle, each shorter spring will equal to each other. You would then be riding using both shorter springs. If you place the isolator 2/3 the way up the oem spring, you would have roughly a 2/3 and 1/3 spring. The 1/3 length oem spring would be much stiffer than the 2/3 spring; and the 2/3 spring would be stiffer than the oem spring. But you should know that you are now riding on the 2/3 spring only. The 1/3 spring is so much stiffer that it doesn't compress until the 2/3 spring has fully compressed since it has the lower effect rate spring.
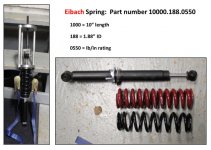
So the question you should ask, what's the down side. I don't think for this riding crowd it might matter too much. The downside as I see it is how long the 2/3 spring would last in terms of consistent performance. The 2/3 spring has fewer coils windings to carry the load; cycling up and down and up and down. If you look at the attached pic, you see the difference in spring design. The Eibach [red] spring is designed for consistent performance over a million spring cycles. You can see, there are a lot of coil windings (yielding long life consistence performance), the stiffness is achieved by thicker coil wire. Looking at the oem [black] spring you see a design that has some cost reduction considerations; less coil windings to get you stiffness because they used thinner wire in making their coils. Based on my test, the oem has a spring rate of 315 lb/in and the Eibach 550 lb/in (advertised, I found them to be closer to 515 lb/in). Since the 515 lb/in rate has worked well for me (205 lb with no riding gear), I would guess most riders will place the isolator close to the middle, perhaps making a 2/5 and 3/5 spring or (if you are heavier) maybe a 1/2 and 1/2 spring. I think you can see you would be riding on a fewer number of coil windings than the oem configuration. The shorter spring will just end up getting weak after many number of spring cycles. I think you will find after a period of time, you will need to move the isolator to a different location on the oem spring. If you were riding on a 2/3 spring, you might have to later run a 3/5 spring (shorter is stiffer). Eventually you end at a 1/2 spring. If you start with a 1/2 spring, then you don't have the ability to adjust, you just have to get another oem spring after while.
The question is how long does it take to wear out the shorter spring that you have to make adjustments... I'd say it depends on how many miles you ride a year, how long you own the bike, and how heavy you load up the bike. The spring may last long enough that this is a cost effective way to solve the stiffness problem because almost all riders can install this devise vs. put in a proper set of springs to do the job. In fact, this would be easier to put on than the upper shock relocators or after market shocks.
We await your follow up posting telling us more about the coil isolator... :bowdown:
Jerry
 opcorn:
 hyea:
hyea: