• There were many reasons for the change of the site software, the biggest was security. The age of the old software also meant no server updates for certain programs. There are many benefits to the new software, one of the biggest is the mobile functionality. Ill fix up some stuff in the coming days, we'll also try to get some of the old addons back or the data imported back into the site like the garage. To create a thread or to reply with a post is basically the same as it was in the prior software. The default style of the site is light colored, but i temporarily added a darker colored style, to change you can find a link at the bottom of the site.

Baldwin Ironworks cat delete install issue - having a hard time getting a seal! Any tips/advice?

fochie

New member
Just "completed" an install of a Baldwin Ironworks cat delete pipe on my 2020 RTL.

Having a hard time getting a good seal from the cat delete pipe to the final (stock) muffler.
Very little of the cat delete ball shaped end fits into the final muffler and the factory clamp bottoms out as well.
Tried moving the clamp around several times but it was still leaking.
Last ditch effort was to goop on some high temp JB Weld Exhaust Seal to both parts and re-clamping it.
I let it dry for about an hour, checked it for leaks, and idled the bike for 10 mins (as per instructions).

It doesn't appear to be leaking now, but I have zero confidence that this is a lasting remedy. Have not ridden the bike since yet.

I spent WAY too much time prepping and installing the pipe (wrapped it and clamped it with fiberglass, sprayed it with high temp silicone, baked it at 400°, etc.) not to mention fighting with the dreaded top spring.

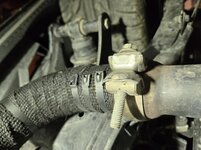
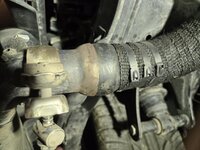
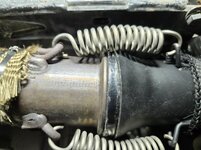
When first dry fitting the pipe, I noticed a miss-alignment with the cat delete pipe and the stock exhaust donut gasket (see pics). At the time, I sent pics and talked with Paul at Baldwin Ironworks (nice guy) and he advised it would be fine since the springs should make it seal ok. It doesn't appear to be leaking... at idle anyway. This was prior to realizing the issue with the connection to the final muffler.

We have a day ride coming up for the 4th this week, then a couple days trip next week, then a week long trip to Colorado at the end of the month. Contemplating putting the cat back on, if this hacked fix doesn't work out before the Colorado trip.

Since BOTH ends of the cat delete pipe do not marry up very well with the stock parts (especially the final muffler connection) I'm thinking of chalking this install up to lessons learned and buying an RLS cat delete muffler and hoping I don't run into the same problem.

So I'm wondering if anyone else has had similar fitment issues with this pipe; and/or any advice on a fix; or thoughts on the RLS pipe fitting better.

Thanks!!
Steve

20250628_145150[1]_min.jpg - 20250702_182441.jpg

20250702_182632.jpg - 20250702_182951.jpg
 
You're right, the JB Weld isn't going to work. That joint is designed to move. It will either move, or it will fatigue and break. The better the JB Weld works, the more chance you have for failure.

Since you can get the clamp on and tightened, there is still hope. Though you will need to get all the JB Weld off.

Paint the male surface with spray paint, let it dry, mate the 2 surfaces and move them around slightly to find the high spots. This will help you locate the areas that are leaking. You may be able to smooth both surfaces as needed to get a better fit.
 
Someone mentioned wrapping the bell end with strips of aluminum foil in multiple layers to stop this type leak. Not sure if it works or not but it might be worth a try. Not sure how long it would last.
 
Aluminum foil melts around 1,200 degrees. Cats under load can get that hot. Though they are designed to work between 600 & 800 degrees. Still, I don't think it would take long for an aluminum foil wrap to go away. It doesn't have to get to melt temps to destroy it. But if someone tries it, I'd love to hear the results.
 
In your photo the clamp does not look centered on the joint. Also your threads on the clamp bolt are orientated to the front where mine are oriented to the rear of the bike.
 
I would take the delete pipe, muffler and clamp to an exhaust shop and if they can fix the mating of the two. And do not tell them it is a delete pipe, or they may refuse to touch it.
 
Only comment I have with those cat springs I found worked really easy was my brake spring tool to get those cat springs back on. That pulling the spring thing didn’t work with my beat up hands and wrists.
 
Thanks all for the input so far.

One of my initial concerns was that the new cat delete pipe "ball end" will only go into the final muffler about 1/16"-1/8", leaving very little surface area for the clamp to take effect IMHO. The shape of the new pipe "ball end" just seems too fat to make an effective joint to me. I should have taken initial tear down pics, but I thought the orig. cat ball end went much further into the final muffler fitting.

I have the clamp spanning both fittings pretty evenly. I originally had the clamp flipped, but put it back on the other way one time when I had taken it completely off. It kind of bothers me that the clamp bottoms out as well.

Ron - assuming that I take this off again and manage to undo the panic mistake I made of spreading JB Weld in the joint, I'll try your "paint scratch"
suggestion. Not sure why this joint is meant to move tho, since I would think that the rubber bushing that hangs the final muffler would provide enough "give" when the whole system is stressed. Then again, I'm just a shade tree mechanic (at best).

Taking it to a muffler shop - good idea! I will explore that as well. Almost inclined to take the pipe and muffler to a welding shop at this point; then again, if the joint is meant to move...

Springs - I hear ya on the hands/wrists thing. I've been using the supplied puller tool along with a ratchet strap through the rear wheel spoke. It works great for the easier lower two springs, but is still a total pain on the upper one. I will have to dig around for my old drum brake tools and maybe give that a try, as suggested. Thx.

Just took the bike out for a ride; the joint seems to be holding, for now. I like the sound (the baffle is in, without the plug). It's a bit stinky, as expected, but hopefully that burns off. I was also concentrating on the handling, since it was my first "real" ride with Ron's Ultimate Sway Bar installed... dang! :) Then again, that's another post.

I will have to properly resolve this before the Colorado trip. Thanks again for all the input so far.
 
Also, the OEM clamp can stretch a bit with repeated use. New clamps cost $20. On my past F3S, I lined the inner clamp with muffler wrap like you have on the delete pipe. The wrap sealed the pipe connection seams and allowed the clamp to fully tighten down. It never leaked after that. I also tacked the wrap down with ATV sealant and let it dry before installing. This way, the wrap won't slide around in the inner clamp.
 
I agree with the ratchet strap technique. It works easily remove or install your springs. Yes, the clamp is reversed in that picture. But you said that you flipped it back? The bolt should be on the bottom with threads towards the rear.

Also, the OEM clamp can stretch a bit with repeated use. New clamps cost $20. On my past F3S, I lined the inner clamp with muffler wrap like you have on the delete pipe. The wrap sealed the pipe connection seams and allowed the clamp to fully tighten down. It never leaked after that. I also tacked the wrap down with ATV sealant and let it dry before installing. This way, the wrap won't slide around in the inner clamp.
BRP says that clamp and gasket are one time use only. I have never had a problem with many repeated installs for testing different setups.

I install my springs first, then install the clamp. Making sure that the clamp is centered over the seam. You can feel the clamp settling in place as you keep a little hand pressure on the rear muffler while you tighten the clamp.
 
Great suggestion Troop. I was trying to think of something that's flexible that I could wrap the joint with under the clamp that'd withstand the heat and help seal things better. I will order a new clamp and give your wrap/ATV sealant method a try. Thanks!
 
They also use those balls joint type on vehicle mufflers too now. Just did one on my truck recently. I was rather surprised by that, but I understand it is much easier to adjust these than it is trying to seal joints with gaskets and aligning.
 
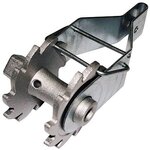
wire-tentioner1.jpg
This is a barbed wire tensioner. It is made to pull the slack out of loose barbed wire. They cost about $5 each.
You can drill that hole on the reel just a little larger and heavy, nylon 550 cord will fit through it. Then tie it off to anything solid directly behind the muffler clamp springs. Park a mower or truck back there if you need to. Make a loop in the free end of the 550 cord and slip it over the spring you want to fasten. One end of the reel axle is square and you can turn it with a wrench. All you gotta do it tighten the reel until the spring is just even with the place it hooks into. The ratchet bail will hold it there. Then you got both hands free to pry the spring over so it hooks where it is supposed to. I have used them before to put the spring up under the inside on. When you got the spring lined up, take up a little slack using the wrench and release the ratchet bail. The spring will go on and hook. It is like having a little tiny winch to work with. You can buy the things on line or at any Farm Supply Store. They come in handy for a lot of things that you don't have enough hands to fix.
 
Back
Top