• There were many reasons for the change of the site software, the biggest was security. The age of the old software also meant no server updates for certain programs. There are many benefits to the new software, one of the biggest is the mobile functionality. Ill fix up some stuff in the coming days, we'll also try to get some of the old addons back or the data imported back into the site like the garage. To create a thread or to reply with a post is basically the same as it was in the prior software. The default style of the site is light colored, but i temporarily added a darker colored style, to change you can find a link at the bottom of the site.

Foot Rest Support and Brake pedal Installation RT -

Jeriatric

Thinks out loud
Surfed SL for input but didn't find what I was looking for. Always kinda liked a line from that R2D2 character.

"MORE INPUT"

Anyway I'm in the middle(literally) of replacing the foot peg supports, driver pegs, passenger boards and brake pedal(all chrome). Whoda thunk?

Out of what I thought would be a stroke of genius I decided to do the left side first. You know, training for the side with more junk!

Well, it may not have been all the training I needed. The left side was pretty straight forward - more labor intensive than difficult but, just for the heck of it I looked at the accompanying instructions for the brake pedal replacement and WOW!!

It's telling me I have to remove the rear trunk, unbolt the master cylinder, and that I need tool # 529 036 119 and on and on. If you have done this you know the drill.

So, do I need the tool, do I really have to pull the trunk and disconnect half the wiring running fore and aft?

Indirections are usually well intended but sometimes they go over the top. Do these?

Answers from the been there done that gang would be much appreciated.

Thanks
Jer

UPDATE: Found a Lamonster video about this. It's filed under,

"What it takes to install chrome handlebars on the RT."

http://www.spyderlovers.com/forums/showthread.php?34313-What-it-takes-to-install-chrome-handlebars-on-the-RT
 
Last edited:
:shocked: I got nuthin'...
...But my sincerest wishes for the best of luck to you in this project! :thumbup:
And we're all going to want to see pictures after you've recovered from it! :roflblack: :2thumbs:
 
"Best of Luck"

Thanks Bob - *Luck and plenty of hydrogen peroxide. I had forgotten how much fun doing things like this can be, save the fact that my hands look like I've done war with a barb wire fence. The older I get the thinner my skin gets! :dontknow: why?
 
For whatever reason most of my pictures break the 2.0 meg threshold (2.1 or 2.2 meg - never higher than that, but 2.0 means 2.0 :( ). So, out of many this is the only one to post.

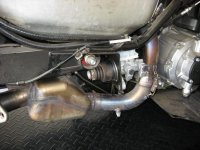
Shot of the master cylinder. Bolts removed but brake lines still attached.

If you happen to do this mod. I suggest you check the brake rod pins (if you were involved in the upgrade). None of mine had any grease on them so they were pivoting metal on metal. While it may not hurt anything - it didn't make any since to me.

Note: The pins on this Spyder were part of the replacement program - it's nothing the factory fell short on.

IMG_0171.jpg
 
Master Cylinder

Not sure if this will be the case for everyone but, the top inside bolt to the master cylinder was an absolute "BEAR" to get started(hand started - I don't wrench things until I know they are started). My thought is that it's most likely going to happen in every instance because snaking it through it's mounting hole on the foot peg support without damaging the rubber boot, requires tweaking things a bit and may well mess up the alignment.

FWIW.
 
Thanks for the advice! :thumbup:
Your pictures.; Have you tried resizing them? If you shrink them down a bit they'll take up a lot less "space" I open mine up in "Paint" and just tinker with them until they fit. :thumbup:
I've lost enough hide over the years to have another "me" knit out of all of the discards... :opps: Look at it this way; the thinner it is, the less it hurts when a piece gets ripped loose! :yikes:
 
"Your pictures.; Have you tried resizing them? If you shrink them down a bit they'll take up a lot less "space" I open mine up in "Paint" and just tinker with them until they fit."

Thanks Bob. I'll give it a shot - no pun intended!

:doorag:
 
So did you use the tool? I still don't understand why they say you need it. I got yhe pins out and pulled the break rod without adjusting the length at all. Also I don't see how you would get the tool in there without unhooking brake lines. I ordered it and it is still in the package.
 
So did you use the tool? I still don't understand why they say you need it. I got yhe pins out and pulled the break rod without adjusting the length at all. Also I don't see how you would get the tool in there without unhooking brake lines. I ordered it and it is still in the package.

Did not need the tool. As I thought and was confirmed once I found Lamonsters post and video on having done the R & R. BRP went way overboard on what needed to be removed in order to facilitate the job. Suggestion, just don't get in a hurry when you do it. Slow and methodical. ;)
 
Back
Top