Hi lousd1,
Re:
Can you share the parts that you used. I was looking to do this on my ST-L.
Somewhat. My son-in-law is an electrical engineer and he got the pushbutton(s) and the male-female connector(s) for me. He decided that only waterproof parts were req'd. I do not think that waterproof parts are necessary but that is your decision to make.
The male-female connector was so that things could be installed seperately & removed seperately.
I went to:
https://www.liftmaster.com/?gclid=CNvLwMS2g8cCFY9gfgodbywPog
and bought their Model 890MAX remote. This is because it appeared to be the smallest that would work with my garage door opener.
Liftmaster: 1-800-528-9131
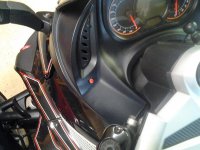
I wanted small because everything behind the pushbutton lies down under the dash. I only had to remove the instrument cluster to get it all installed & secured back there. I've removed the instrument cluster before so that was easy for me.
My son-in-law tapped into the remote and brought two wires out of it to attach to the male-female connectors. He had to solder onto the circuit board on the remote; and he said it was not easy. Care is very necessary when doing this so that you do not damage the circuit board.
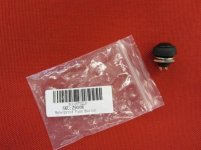
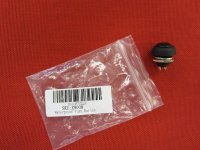
Here is the pushbutton(s) that he bought for me:
I do not know just what the male-female connectors are; he ordered this stuff from the internet & had it shipped directly to me.
The pushbutton requires a 15/16" hole in the dash. I drilled this by starting with a drill of about a 1/4" and working my way up. Make sure that you locate the hole for the buton such that when it is mounted that it does not interfere with the instrument cluster. Masking tape works wonders when doing the hole locate.
I put a used hand towel under the dash to capture whatever might fall back there. And do not remove it until you are completely finished. You are warned.
I simply could not get the nut that comes with the pushbutton on with trying to work under the dash with one hand on the button and ( blindly ) trying to get the nut on it. So, another trip up to the hardware store for a better nut that worked. VOILA!!!! If I were doing it again, I would find a pushbutton that snapped into place from the outside; not being a contortionist, this was possibly the most difficult part of the entire process.
Then the male-female connector(s) that he bought me would not go through the hole in the dash. So, a trip to my local electronics store for some covered spade connectors.
Also I had to make two trips to get wire that would work. The first wire was just too large to work on the male connectors on the button.
After ruining two buttons trying to solder wires on the male connectors, another trip to the electonics store for some really small female spade connectors worked after crimping them ever so slightly so they would not fall off once everything was installed under the dash.
I used a number of small nylon zip ties to hold the excess wire and the remote together so things don't bounce around under the dash & come loose.
You sure you still want to do this?
Jerry Baumchen
PS) And during this entire process, the circuit board on my 1-yr old garage door opener went out. 3-4 days later & $201 ( with my senior discount :yes: ) I had the garage door opener going again. You real, real sure you want to do this? :joke:
PPS) If you have a good electronics store near you, print this all out and take it to them. You can probably buy everything but the remote from them.