• There were many reasons for the change of the site software, the biggest was security. The age of the old software also meant no server updates for certain programs. There are many benefits to the new software, one of the biggest is the mobile functionality. Ill fix up some stuff in the coming days, we'll also try to get some of the old addons back or the data imported back into the site like the garage. To create a thread or to reply with a post is basically the same as it was in the prior software. The default style of the site is light colored, but i temporarily added a darker colored style, to change you can find a link at the bottom of the site.

LED turn signals on side mirrors RT...

carajony

New member
I wanted to install turn signals on my side mirrors but didnt want to drill a hole so I did it the long and hard way..:banghead:.. I am posting pics... I tried to be as specific as I could in the photos... Gona try to post them all here... Prob gona have to do it in a few posts... here goes..

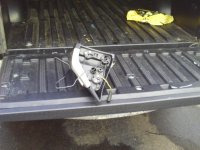
Of course first remove your mirrors... There are videos here on the forum that show you how..
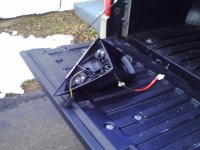
Next find a place to dismantle.... They are a pain to dismantle and you have to be very careful cause the only thing holding these babies together are plastic clips that can break or crack and be loose like on mine now...
Spyder Mirror Dismantle 1.jpgSpyder Mirror Dismantle 2.jpgSpyder Mirror Dismantle 3.jpgSpyder Mirror Dismantle 4.jpgSpyder Mirror Dismantle 5.jpgthats my finger pointing to where the clips are... there are 2 back parts that each have 3 clips.. be careful when pulling...

Wont let me load any more pics so gone reply to this one and add...
 
more pics

Here are more pics...
Spyder Mirror Dismantle 6.jpgSpyder Mirror Dismantle 7.jpgSpyder Mirror Dismantle 8.jpgSpyder Mirror Dismantle 9.jpgSpyder Mirror Dismantle 10.jpg
its dismantled... as you can see the turn signal in the back of the housing has 3 screws... remove them and just put it to the side...

More pics next post...
 
even more pics...

Here are some more...
Spyder Mirror Dismantle 11.JPGSpyder Mirror Dismantle 12.jpgSpyder Mirror Dismantle 13.JPGSpyder Mirror Dismantle 14.jpgSpyder Mirror Dismantle 15.jpg

I used the plastic pull thingy that came when I bought my HMT light... works great... very handy... As you can see I just pulled the wires out the back ...

More pics another post...
 
Last pics

Here are the last ones..
Spyder Mirror Dismantle 16.jpgSpyder Mirror Dismantle 17.jpgSpyder Mirror Dismantle 18.jpgSpyder Mirror Dismantle 19.JPG

You can see i pulled the wires through the same hole of the existing light wires... I spliced them together,,, Black on black neg and the other with the other...lol.. works great... Not that long to do but you have to be careful..

Putting back the mirrors really sucked too... doesnt want to catch the bottom clip...

There it is...
 
Same way I did it but I did not video the how too as it was my first farkle video....
Your pictures give all the detail!

Good job!

Bob
 
Since we did it the same way I thought I would share my vids of what this looks like.

In my opinion it is well worth the trouble to do it!


Follow up showing my farkle in action!


Bob
 
mirror removed

ok please let me ask a few dumb questions as I have taken the mirror off but I know I wont be able to dismantle it and put it back together in one piece can you snake a wire thru the mirrors back some way and out the front under the glass with out breaking it apart or run a wire between the mirror and posts out the bottom to the lights any case you did a terrific job and wish I had some merchanical ability to do it I had Led lights sit here for 8 months and could not find a local person to help me install them so I just mailed them back to the company in hopes to get 50 % of my money back thanks Rich
 
The only way you MGIHT get lucky and fish it through without taking the mirrors apart is to tie a small thin washer to a piece of thread and then shake and try to rattle it's way through the hole and out under the light bulb holder. YOU MIGHT get lucky and get this to work.

Bob
 
The only way you MGIHT get lucky and fish it through without taking the mirrors apart is to tie a small thin washer to a piece of thread and then shake and try to rattle it's way through the hole and out under the light bulb holder. YOU MIGHT get lucky and get this to work.

Bob

I'd probably get one side this way and then the other side would absolutely never work out! Good jobs and thank you to both of you for posting the how to information. :2thumbs:
 
Thanks for this tutorial/Mod! I just finished it up....while on my lunch break. :yes:


:clickpic:


(although I did manage to break off one of the clips to the top panel.... guess I need to get some double-sided sticky tape) :banghead:
 
You don,t have to fish anything if your drill you hole near the rear lower clip on the mirror. Take the screw of that holds the clip and feed the wire in there then though the side walls to the main wire? Pictures are worth a thousand words--
 

Attachments

  • Light 002.jpg
    Light 002.jpg
    55.3 KB · Views: 489
  • Light 004.jpg
    Light 004.jpg
    53.3 KB · Views: 547
Mirrors.

I was able to open the housing and remove the mirrors but had the unfortunate accident of breaking one of the mirrors while on the table. Does anyone know where I can get an exact replacement mirror?
 
I was able to open the housing and remove the mirrors but had the unfortunate accident of breaking one of the mirrors while on the table. Does anyone know where I can get an exact replacement mirror?[/QUO i have seen the answer to your troubles.. it is posted in spyderlovers.. sorry i can't tell you more.. you will have to search.. the article describes the fact, one must buy a whole assembly (very expensive) or, as the author did, buy a replacement mirror from pep boys or another parts store similiar.. the replacement was for a ford truck or something.. it had just the right curvature, and was larger than the spyders.. he then took it into a glass shop, and they cut it to the exact size.. in his case, he had just cracked his original and they measured off of that.. maybe another member knows of the peticular article.. good luck...
 
I was able to open the housing and remove the mirrors but had the unfortunate accident of breaking one of the mirrors while on the table. Does anyone know where I can get an exact replacement mirror?[/QUO i have seen the answer to your troubles.. it is posted in spyderlovers.. sorry i can't tell you more.. you will have to search.. the article describes the fact, one must buy a whole assembly (very expensive) or, as the author did, buy a replacement mirror from pep boys or another parts store similiar.. the replacement was for a ford truck or something.. it had just the right curvature, and was larger than the spyders.. he then took it into a glass shop, and they cut it to the exact size.. in his case, he had just cracked his original and they measured off of that.. maybe another member knows of the peticular article.. good luck...

It was me and this is the post I mad. In that thread I also gave a template you can take to the glass shop if your mirror cannot be used to trace out a replacement.

http://www.spyderlovers.com/forums/showthread.php?69613-Break-your-mirror-Replace-it-cheap!

Bob
 
m.

I had 2 mirrors cut for my Goldwing and the guy only charged $7.00 each. Exact size and shape - only flat like I wanted.
 
Done a little different

I saw how you guys did this and I started to take the mirror apart and it is a pain, and then I'm looking at where the wire needs to end up and I'm thinking why tear the mirror apart, drill into the back and call it even. So see pixs that is what I did. I also drilled thru the support plastic, just to be neater.

Now Finless I think in another post was saying that after 8 months or so the LED strip plastic got soft and sticky. I know cheap Chinese stuff. Thinking about that I decided that maybe it was UV damage after time. So I decided to coat the strip with Aero Marine epoxy, couldn't hurt. I also had an issue with the cheap sticky stuff on the back, one didn't stick at all and the other strip stuck half a$$.

Note to self, if there is a next time, use some super glue and stick the strip down first. THEN mix up the epoxy and apply it. The strip wants to lift where you put the 90 in the wire thru the hole and a 4" strip curves a little at the other end. I'm still waiting for the epoxy to dry so can't show you the finished front yet. AND even though I didn't break any tabs one of them doesn't hold the chrome piece in right. I'm debating whether to put a dab of super glue there or not. It doesn't look like it will come apart and the gap isn't much more than normal. :banghead::banghead:


attachment.php
attachment.php
 

Attachments

  • mirror2.jpg
    mirror2.jpg
    51.8 KB · Views: 711
  • mirror3.jpg
    mirror3.jpg
    54.2 KB · Views: 718
Back
Top