• There were many reasons for the change of the site software, the biggest was security. The age of the old software also meant no server updates for certain programs. There are many benefits to the new software, one of the biggest is the mobile functionality. Ill fix up some stuff in the coming days, we'll also try to get some of the old addons back or the data imported back into the site like the garage. To create a thread or to reply with a post is basically the same as it was in the prior software. The default style of the site is light colored, but i temporarily added a darker colored style, to change you can find a link at the bottom of the site.

Made myself an Adjustable brake rod on the cheap!

jma57

Member
I purchased the F3 with # 3 rods, soon after I switched to # 4 rods. That made it better but the height of the brake pedal never felt right.
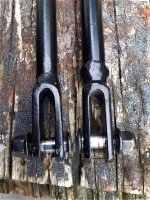
Turns out the rods are hollow, so I cut my spare #3, threaded it for 5/16 and bingo. I can adjust it to any height I want, total cost: $3 plus the rod.
I can't forgive BRP for not making the brake pedal height adjustable when the shifter IS adjustable on the same trike!
A couple of pics of before and after.
 

Attachments

  • IMG_20221028_193013146[1].jpg
    IMG_20221028_193013146[1].jpg
    80.5 KB · Views: 254
  • IMG_20221028_193206974[1].jpg
    IMG_20221028_193206974[1].jpg
    49.6 KB · Views: 237
  • IMG_20221028_195503535[1].jpg
    IMG_20221028_195503535[1].jpg
    58.8 KB · Views: 223
:2thumbs: good job!!! To many times people just over think and are too scared to think out of the box and adjust!!! Good job!!
 
Just wanted to cofirm you threaded the brake linkage rod with a tap to accept 5/16" thread rod? Does anyone know what position a 6'2" rider with a 34 inseam would run at new 2022 spyder coming in the spring and want to get the right brake linkage. I am assuming position 5?

thanks Brent
 
Hi there. Im 6'2" with 34". I picked up my new to me F3 with a pos 3 bar. It was too close. So I made a pos 5 bar.

bar 1 2 20220524_084110.jpg bar 2 1 20220524_084136.jpg

Then I decided that it was a bit too far so I began to assemble some bits for a pos 4 bar. Then the wife had expressed an interest in having a go on the F3. She is much smaller and would require a 1 or 2 bar as the pos 3 was way too much.

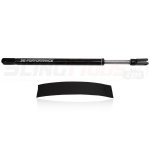
Then I spotted this for sale locally here in NZ. Brand new and 1/2 the price of a new one from the US + postage so I grabbed it.

brake rod s-l1600.jpg

I set it up for pos 4 and its great for me. Next time the wife shows and interest its not much of a job to refit it to say pos 2 .
 
Nice DIY! Be cautious, though, that as the brake pedal drops in height relative to the footing position, it also changes the ratio of the brake pedal arc and the plunger displacement in the master cylinder. If flattened too much, there were be little master cylinder plunger movement, which could be an issue with a slight drop in brake fluid, resulting in loss of braking power and or bottoming out on an OEM or aftermarket floorboard. However, your mod likely improved your panic braking reaction time!
 
When riding my 2018 F3L I end up with half of my foot out past the end of the footboard and I have lift my foot up and back to reach the brake. I was thinking of moving the board from position 3 to position 4 and continue to use the #3 rod to change the height of the brake pedal. Any thoughts? Thanks.
 
I think your on the right track. :thumbup:

Obviously if your foot it past the end of the floorboard its too close, well for my comfort anyway.

Moving the board also moves the brake.

I swap mine back for the wife to a 2 pos and me for a 4 pos.

I made a block of wood so when I make the swap out the brake pedal is just able to slip underneath so it takes all the guesstimate out of it with regards to height.
Take note of the brake height position before you move anything I reckon is worth considering.
Here is a video on how to.

Being a belt and braces bloke I popped a drop of blue lock tight on the threads.
https://www.lamonstergarage.com/spyder-f3-brake-linkage-install/


There is a monster video on how to.. well part of it. The pad has some nuts that need loosening. some heat was applied to the Clam shell nuts to assist as they they thread-locker on them. . Cant seem to locate that one.
 
Last edited:
Yes, I was looking at Lamonster's brake rods and thought... if I move the board, why not try the #3 rod? It's terrible knowing a little bit about of things mechanical ;-)
 
Last edited by a moderator:
FYI... I unbolted the brake rod and moved the foot board down to position 4. The #3 rod is way too short to use there. Will have to look into Lamonster's modified brake rods, I guess.
 
Last edited by a moderator:
Yes, I was looking at Lamonster's brake rods and thought... if I move the board, why not try the #3 rod? It's terrible knowing a little bit about of things mechanical ;-)

Hahaha…….you aren’t the only rider to think that way, CJR. Someone very near and dear to my heart tried exactly the same thing, with similar success to you.;) ……. Go the Lamonster route……works a treat:ohyea:

Pete
 
When I looked into this question of an adjustable brake linkage, my idea was first cutting the linkage in half, tapping one piece right hand thread, tap the other left hand thread, then use a turnbuckle to adjust the length. I haven't tried it because a #5 was just right for me.

jma57's idea of a tapped rod looks pretty good to me. Putting some black heatshrink tubing over it after adjustment would be a good idea for protection from the elements.

Andrew, heatshrink tubing is decidedly a more elegant solution, however I had none in the garage when I had the adjustment just right, so 3 coats of paint made it look almost OEM.
 
I use the plastic automotive tape as I swap it from 2 to 4 depending on who is the pilot. Doesn't really matter what is used as long as it keeps the water/road crap out of the threads n stuff so you dont get corrosion and crap wrecking stuff reckon. . If I was the sole rider I would go the heat shrink way with a protective sleeve from tip to toe. But im a belt n braces guy as apposed to rip/+++t/n/ bust type. Each to their own.
 
Back
Top