• There were many reasons for the change of the site software, the biggest was security. The age of the old software also meant no server updates for certain programs. There are many benefits to the new software, one of the biggest is the mobile functionality. Ill fix up some stuff in the coming days, we'll also try to get some of the old addons back or the data imported back into the site like the garage. To create a thread or to reply with a post is basically the same as it was in the prior software. The default style of the site is light colored, but i temporarily added a darker colored style, to change you can find a link at the bottom of the site.

New Update Nov 30 '24 - anyone updated their '24 RT? What does it do?

I get power to the plug when the Spyder goes into reverse, so it is not that fuse. I was hoping the reference was to a fuse on the camera feed to the dash.:cry:

Thank you for the pic! I have been scouring the web with no luck.

The new panel is $225 so I figure I can do without the fancy bevel on the hole.;)

Since the Sea to Sky had the camera in 2024, I have some hope that I can get this working...
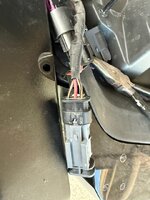
The 2024 Sea to Sky did NOT have a camera or a camera hole - mine is a 2024.

All the 2024 has for the camera is the lead and the lettering on the fuse box.

I’m thinking the back panel also has a way to mount the camera bracket, as well as the hole for camera.
 
OK, Dansy, I am confused. You attached the picture and said "I insert a photo from someone else's S2S 2024 camera".

So is the picture of a 2024 S2S or is it really a 2025?
 
I just had the backup camera installed on my 2025 F3-T. According to my mechanic the installation went really easy. He got it all hooked up, turned the bike on, put it in reverse and nothing on the dash. He discovered that along with installing the camera you have to tell the computer that it is installed. He went into the menu on the screen and searched until he found where you can turn on the backup camera. Fast forward to 26:10 in the video.

 
Great video! I watched the entire thing and learned a lot. Thank you Peder.

Unfortunately, I tried turning the camera on and off on the dash but the picture never came up, nor did any of the IR lights come on. And I verified that the plug has power when put in reverse.

I had to put everything back together for a Teddy Bear for Kids ride yesterday and will be doing a cat delete tomorrow so it will probably be a week or so before I pull it back apart to play with the camera again.

Thanks to everyone for their responses; with all of us involved I'm confident I'll eventually have the camera working. Even if I have to buy the $225 back fender...
 
OK, Dansy, I am confused. You attached the picture and said "I insert a photo from someone else's S2S 2024 camera".

So is the picture of a 2024 S2S or is it really a 2025?
2025

Let us know what was required to make this work, I’m interested…
 
OK, that explains my confusion.;)

Spent the better part of the afternoon installing my RLS cat delete. I used a ratchet strap to stretch the springs which made them much easier to remove/install (that top spring is a bxxxh). I'm going to enjoy our beautiful spring weather and do some riding this week.

I contacted BRP to get a shop manual but they are waiting for a couple of sections to be finished. Once I have that, I'll start doing more testing of the camera.
 
Just downloaded the 2024 RT manual. The wiring diagram on pages 367-369 show wiring for "Camera" so there is hope. :)

Now I just have to pore through 1198 pages to figure out how to get the camera working.
 
I can confirm that a backup camera works on a 2024 Spyder RT Limited. I bought a cheap camera on Amazon and was able to get it to work.
This was the camera I used:

https://www.amazon.com/dp/B0B95J5JC5?ref=ppx_yo2ov_dt_b_fed_asin_title

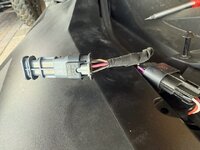
The 3 pin connector that has been discussed previously near the left rear light IS the connector for the camera.
Here are pics of mine.

plug1.jpeg - plug2.jpeg

The male end with end cap plugs is attached to the female end with the wires.
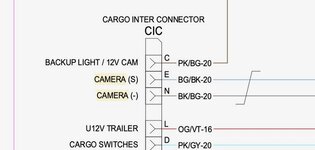
Here is a clip from the maintenance manual of the pinout.

wire2.jpeg

Also, here you can see the Camera (-) eventually goes to ground.

wire1.jpeg

So I connected the cameras - and power - to Camera (-), the cameras power + to Backup Light / 12V Cam, and the cameras signal to Camera (S).

Turned on the Backup Camera in the software and put it in Reverse and the camera image displayed on the screen.
Since this wasn’t the OEM camera, I’m not sure the backup lines mean much.

Also, I’m waiting on some terminal connectors so I can use the existing male end rather than wait 2-4 weeks to get one from Amazon.
Finally still trying to decide it I will use this camera or buy another one and where to mount it… but at least it works.
 
I followed those instructions with the BRP camera and it still wouldn't show on the screen.

But your post gives me hope that I'll eventually get it working and past the blue screen. Thank you!
 
I got the same camera from Amazon. I plan to tap into the lines for the camera AT the CIC connector as I already have a jumper in there for the Show Chrome trunk lights. A lot easier than tearing the left saddle bag apart again. OK It was a lot easier than I thought. It is electrically connected at the CIC connector and I just have to figure where I will mount the tiny camera. It does not have IR LEDs but they are white and will work well with the Spyder's backup lights. If it does not rain again tomorrow I will take it out and see how well I can back up with the field of view on this camera. Total cost of this mod, not counting my tools and materials I have lying around was $10.
 
Last edited:
NATIKA Backup/Front View Camera,IP69K Waterproof Great Night Vision HD and Super Wide Angle Metal OEM Style Reverse Rear View Backup ...

This is the camera I installed on my wife’s 24 RT-L
 
Last edited:
That is a lot nicer than the one I have, may have to get one.
If I could figure out to post pictures on here I’d post some. :)

I mounted it below the license plate directly behind the mud flap. The blot is vertical. Super clean look.

IMG_0925.png
 
If I could figure out to post pictures on here I’d post some. :)

I mounted it below the license plate directly behind the mud flap. The blot is vertical. Super clean look.

View attachment 249511
Did you use one of the wedge spacers that come with the camera, or is that with just the camera flat against the area below the tag? If you used a wedge, do you remember which one and was it to pitch the camera up or down for better coverage? Thanks.
 
Did you use one of the wedge spacers that come with the camera, or is that with just the camera flat against the area below the tag? If you used a wedge, do you remember which one and was it to pitch the camera up or down for better coverage? Thanks.
I did not use any of the wedges and I feel it’s about right.
I took the back piece that holds the tail lights completely off to install the camera. After the camera was fastened on, I clipped the back piece back on and tried the camera. You could easily add a wedge before you put everything back together. The only one of the 3 wires they give you the option to cut was the wire to eliminate the guide lines, (I think it was white?)


When the back piece is just “clipped” on, make sure the view is correct before you put it back together. Looking LAs in front/back view.

Also, I checked several times while putting it back together to make sure no wires got pinched or anything. :)
Thanks, really helps. I am waiting for that camera to come tommorrow, I had one of another brand, but for some reason it would not display, just shows the blue box with gridlines. I am hoping that camera is bad, but if not I will close the bike up with the new camera mounted until I get another idea. I have the most current software, and have verified power and ground plus connectivity through the video wire past the bikes plug. If the camera does not help, there must be something on the bike itself.
 
Thanks, really helps. I am waiting for that camera to come tommorrow, I had one of another brand, but for some reason it would not display, just shows the blue box with gridlines. I am hoping that camera is bad, but if not I will close the bike up with the new camera mounted until I get another idea. I have the most current software, and have verified power and ground plus connectivity through the video wire past the bikes plug. If the camera does not help, there must be something on the bike itself.
On this camera, positive goes to middle red wire on plug, negative goes to black with tan stripe on plug and the video which you have to cut off rca plug and find the orange? wire, which goes to the tan with a black stripe on plug.

To make sure you have the correct video wire, (once you snip off the rca plug) strip it to see the wires and use a continuity tester to see which wire goes to the male end of rca plug, that’s the one you want. (Hopefully that makes sense). :)

I took a paper clip cut into 3 pieces and soldered to the end of each wire and pushed them into the plug on the Spyder. Make sure your paper clips fit into plug before soldering tho.
I taped, heat shrunk and split loomed as needed.

Then, once you get video, you can cut the tiny wire on cord (I think white) for the lines or, you will have 6 lines which makes it look weird. The instructions are super clear on which wires to cut, so you should have no problem figuring it out. If you ever cut the wrong one, simply twist them back together again and tape up.

I’m absolutely no expert on this but, I’ll check back and give you any help that I can.
 
Back
Top