• There were many reasons for the change of the site software, the biggest was security. The age of the old software also meant no server updates for certain programs. There are many benefits to the new software, one of the biggest is the mobile functionality. Ill fix up some stuff in the coming days, we'll also try to get some of the old addons back or the data imported back into the site like the garage. To create a thread or to reply with a post is basically the same as it was in the prior software. The default style of the site is light colored, but i temporarily added a darker colored style, to change you can find a link at the bottom of the site.

Backrest installation question

vampyregirl

Member
I ordered and received the Road Krome passenger backrest and mounting bracket. The mounting bracket came with NO instructions, but a heck of a lot of pieces!!! Does anyone on here that has one still have the installation instructions and/or diagram for theirs?? If you do, can you share it please????

I'm adventurous when it comes to taking stuff apart and putting stuff together, but this one has me scratching my head.... I don't want to mess up anything under the seat!!! I have emailed the place I ordered it from to see if they have it as well. I figured trying to get it from 2 sources gives me a better shot of obtaining it!!!

Thanks in advance folks!!! :doorag:
 
THE BOTTOM BRACKET

The one that attaches by the passenger handgrips has four torx bolts ..... only use two for the front .... get two hex head bolts the same size for the rear because the torx will take you forever to get them tight ...there is no room ...... Also the plastic OEM panels with the turn signals that you need to remove ..... I made cuts in them so they could slide into the bolt .....otherwise you must dis-assemble the entire rack if you need to remove those Tupperware panels for any reason .....I only bought the lower brackets ....not the entire package ,I made my own backrest and rear rack to carry a HARD CASE ..... so the rest I can't help you with.......Mike :thumbup:
 
Thank you!!!

This seems like it's going to take a while. I'm going to save this job for a couple of days (my day off). For some reason I'm seeing much cussing in my future..... :roflblack:
 
Last edited:
NOT REALLY

Thank you!!!

This seems like it's going to take a while. I'm going to save this job for a couple of days (my day off). For some reason I'm seeing much cussing in my future..... :roflblack:
.If you get the HEX head bolts you won't have to REMOVE the seat to get it on ...... because you can get a wrench on them.... the hardest part is the Tupperware ...........and give serious thought to cutting a notch so you can get them on & off ....I rode it this way for 2 years and NO damage to the Panels because of the cuts........good luck,.....Mike :thumbup:
 
Hi Mike,

Re: ...........and give serious thought to cutting a notch so you can get them on & off ....

This is what the SmoothSpyder backrest instructions tell you to do.

I have never heard of a problem with doing this.

Jerry Baumchen
 
.If you get the HEX head bolts you won't have to REMOVE the seat to get it on ...... because you can get a wrench on them.... the hardest part is the Tupperware ...........and give serious thought to cutting a notch so you can get them on & off ....I rode it this way for 2 years and NO damage to the Panels because of the cuts........good luck,.....Mike :thumbup:

Tupperware is a pain, but not a problem. Stopping at the hardware store on my way home from work tomorrow to get hex head bolts!!! I've got a Dremel, so cutting the notch should be ok.

Now the only thing giving me any pause is the flat pieces with bolts welded on them. I'm assuming I'll have to get them under the passenger handrail. After that, I did buy the backrest pad, and that's easy. Also got brackets for a luggage rack. I happen to have a hard case left over from my Honda Shadow. It never got installed on the Honda, but I have everything to put it on the back of the Spyder!!!! :D Trying to give myself a little more storage for those trips to the grocery store!!!
 
Hi Mike,

Re: ...........and give serious thought to cutting a notch so you can get them on & off ....

This is what the SmoothSpyder backrest instructions tell you to do.

I have never heard of a problem with doing this.

Jerry Baumchen

Thank you for pointing this out!! I went and printed out their instructions. Seems like the same type of parts that I have from Roadkrome!!! YAY!!! If nothing else, I'll have a good guideline to go by!!! WOO HOO!!!!!!
 
Hi vampyregirl,

Re: I've got a Dremel, so cutting the notch should be ok.

I first tried that and it did not work worth a d***. :banghead:

What did work just fine was to remove the push pins, I then put a small piece of Formicea under the holes and then used a carton cutter. It took maybe 5 minutes to do it this way.

The Dremel just seem to want to melt the Tupperware rather than actually cut it.

Best of luck,

Jerry Baumchen

PS) The Formica was so I did not cut what was under things and to make sure that I did not just dull the carton cutter blade; because things will slip now and then.
 
THOSE NOT COMPLETELY FLAT PIECES

Tupperware is a pain, but not a problem. Stopping at the hardware store on my way home from work tomorrow to get hex head bolts!!! I've got a Dremel, so cutting the notch should be ok.

Now the only thing giving me any pause is the flat pieces with bolts welded on them. I'm assuming I'll have to get them under the passenger handrail. After that, I did buy the backrest pad, and that's easy. Also got brackets for a luggage rack. I happen to have a hard case left over from my Honda Shadow. It never got installed on the Honda, but I have everything to put it on the back of the Spyder!!!! :D Trying to give myself a little more storage for those trips to the grocery store!!!
Yes that's where they go, mine had a "V" on them to fit in the groove for clearance on the battery corner ....after the Tupperware is off putting them on is easy and makes sense because you don't have to hold the nut's and it way stronger .........and Jerry's idea is a good one....make sure the BOX cutter blade is the heavy duty type or it will likely snap under pressure.......PS you go girl, I love a DIY'er..........my Hard case came from JC Whitney $45.00 , it was hugh :roflblack::roflblack:......Mike :thumbup:
 
Last edited:
UGH!!! Hadn't thought about the plastic melting with the Dremel!! I have several box cutters laying around here, so I'm set up for that!! Hex bolts purchased as well!!

Won't be starting this until tomorrow, though. Going to a local car show later, and don't want to try to rush the job and break something (that's just my luck). Plus I'm rydin' to the show!!!

Read through the Smoothspyder instructions and they match up perfect for what I have!!! Yeeesssssssssss!!!!!! I will be taking pictures and share them. Hopefully not too much cussing!!! :roflblack::roflblack::roflblack:
 
Thank you!!!

This seems like it's going to take a while. I'm going to save this job for a couple of days (my day off). For some reason I'm seeing much cussing in my future..... :roflblack:

And don't forget the after install libation. :coffee::coffee:or :cheers::cheers: (my preference). :roflblack:
 
Just a refressher here is smooth spyder install
hope this helps & the parts are as well designed as what Jim has made to fit
 
Hi vampyregirl,

Re: Hopefully not too much cussing!!!

It would not be a real DIY project without that. :banghead:

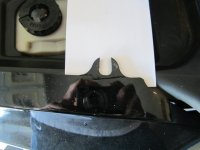
Here is a photo of one of 'slots'. I put a white card behind it so that it shows up better for the photo. And yes, that is me holding my camera in the reflection:

slots.jpg

Best of luck & keep us updated,

Jerry Baumchen
 
Last edited:
I ordered and received the Road Krome passenger backrest and mounting bracket. The mounting bracket came with NO instructions, but a heck of a lot of pieces!!! Does anyone on here that has one still have the installation instructions and/or diagram for theirs?? If you do, can you share it please????

I'm adventurous when it comes to taking stuff apart and putting stuff together, but this one has me scratching my head.... I don't want to mess up anything under the seat!!! I have emailed the place I ordered it from to see if they have it as well. I figured trying to get it from 2 sources gives me a better shot of obtaining it!!!

Thanks in advance folks!!! :doorag:
I have to admit that I have forgotten to include the Installation Instructions on rare occasions:yikes:. When that happens, I almost fall over myself trying to email them to the customer so he (she) isn't held up. This Company should do the same, it's called "Customer Service". The passenger backrest is very important when you want to.....
Riede in comfort,
 
No pictures yet, 'cuz I'm not finished. It's been a day. I am 1 nylon locking nut away!!!!

I ended up using a pair of tin snips to cut the notch in the plastic. Fits very nicely!!!! Thanks for that advice!!! Then I stripped a bolt, and had to get my dad to come over to help drill it out. That was an hour delay--had to go to ACE for cobalt drill bits since mine are just generic ones. Then decided to go BACK to the store and swap out ALL of the bolts with hex heads.

Got to use my new drill bits again when I MacGuyvered the mounting plate onto the luggage bracket. If my grandpa were still alive, he'd be proud!!! They are not the same brand, so they don't technically work together. They do now!!!! :yes: A couple new holes in the plate and a small mounting bracket (for the mounting plate), and we're good to go!!! It's not the prettiest, but everything is locked down tight, so I'm not worried about it!!!

Was doing the finishing touches, and realized the bolt that got stripped is holding the last locking nut..... :banghead::banghead::banghead: By then, I'd had it for the day. It was 87 degrees here today. I had a fan blowing on me in the garage, but that didn't help much. I will make another trip to the store in the morning (with an extra bolt I bought) to get the right size.

I have been taking pictures, so I'll get them on here eventually!!!
 
Last edited:
OK!! Finally got the pictures!! I ended up taking it apart, painting in some scratches (from the bolt getting stripped and trying to remove it), and using some silicone sealant on a rubber edge so it doesn't get water logged. I have asthma and the weather here has been "swampy", so it took time to get everything dried. Not good for the lungs either!!!

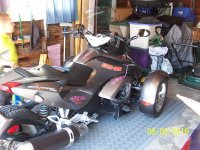
Before: 100_1326.jpg

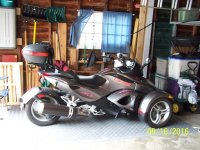
After: 100_1341.jpg

I didn't have the top box snapped down, so there is a gap in the picture. Thanks for all the advice!!! It took a bit, but I did it!!! :yes::yes::yes:
 
Back
Top