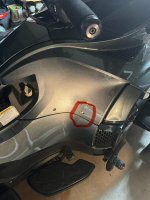
-
There were many reasons for the change of the site software, the biggest was security. The age of the old software also meant no server updates for certain programs. There are many benefits to the new software, one of the biggest is the mobile functionality. Ill fix up some stuff in the coming days, we'll also try to get some of the old addons back or the data imported back into the site like the garage. To create a thread or to reply with a post is basically the same as it was in the prior software. The default style of the site is light colored, but i temporarily added a darker colored style, to change you can find a link at the bottom of the site.
You are using an out of date browser. It may not display this or other websites correctly.
You should upgrade or use an alternative browser.
You should upgrade or use an alternative browser.
New side panel “fake” post replacements needed
- Thread starter Allen42
- Start date
BLUEKNIGHT911
Sadly Passed Oct 2024 - RIP
Are those the ANGLED KNOB - blk plastic pieces that go into a rubber grommet (and are a *itch) to assemble??? If so, I have four of them that I removed from my 14 RT and replaced with a small nylon block, so that I now use a reg machine screw to hold the panel ..... Mike :thumbup:
Last edited:
JayBros
Well-known member
The part number for the Angled Knob is 705003746. There is a separate security tool you need to remove the broken part and install a replacement. To avoid breaking the knob when reinstalling the panel, first spray the rubber grommet into which both knobs fit, then insert the angled knob into the grommet, and, last, flex the upper panel itself to insert the straight pin, the Knob, PN 705003842 into its grommet.
pegasus1300
Well-known member
Mike, do you have pictures of that mod in one of your albums?
JayBros, thank you for that assembly information. By putting a little Windex on the rubber gromets I have always been able to get them to go in fairly easily but have never paid attention to the sequence before. My grommets are getting old and chewed up and I need to replace them.
BTW if you are having trouble keeping your rubber grommets in place when replacing that panel, I wrapped mine with a small zip tie to hold them and squirt them with Windex to aid in the slipperiness. It evaporates quick, leaves no residue, and doesn't hurt the rubber.
BLUEKNIGHT911
Sadly Passed Oct 2024 - RIP
Mike, do you have pictures of that mod in one of your albums?
JayBros, thank you for that assembly information. By putting a little Windex on the rubber gromets I have always been able to get them to go in fairly easily but have never paid attention to the sequence before. My grommets are getting old and chewed up and I need to replace them.
BTW if you are having trouble keeping your rubber grommets in place when replacing that panel, I wrapped mine with a small zip tie to hold them and squirt them with Windex to aid in the slipperiness. It evaporates quick, leaves no residue, and doesn't hurt the rubber.
Sorry no I don't :banghead: .... but it was simple ....after removing the angled knob, I filled the depression with a piece of 1/4 in thick nylon ( left-over from my snomobile days ) .... I attached it with a rivet and drilled a hole for a small machine screw. Or you could glue a piece of something that would allow glue to hold it place behind the panel.... or get FOUR of the BRP metal clips and use 10mm panel bolts, like all the panels use to attach panels to the each other .....Mike :thumbup:
Last edited:
Are those the ANGLED KNOB - blk plastic pieces that go into a rubber grommet (and are a *itch) to assemble??? If so, I have four of them that I removed from my 14 RT and replaced with a small nylon block, so that I now use a reg machine screw to hold the panel ..... Mike :thumbup:
I kind of like that idea.
I've had my side panels off and on I don't know how many times and I haven't had any issues with them. I spit on them to easily pop them back in and I've never had them break off or otherwise come loose unless I pop them off.
Glad for you. I didn’t do this. One of the many techs I had working on it did. But my question was do you know where I can get replacements?
The part number for the Angled Knob is 705003746. There is a separate security tool you need to remove the broken part and install a replacement. To avoid breaking the knob when reinstalling the panel, first spray the rubber grommet into which both knobs fit, then insert the angled knob into the grommet, and, last, flex the upper panel itself to insert the straight pin, the Knob, PN 705003842 into its grommet.
Perfect thanks! Spending on price I may order few each. I have a security torx already, hopefully that’s the tool you mention.
Snoking1127
Well-known member
Go to the link in post #2 and select item 7845 for the angled one.
Glad for you. I didn’t do this. One of the many techs I had working on it did. But my question was do you know where I can get replacements?
Here you go, I think. The parts page is a little hard to read. Thank Bert, he posted the page below.
https://www.canamseadooskidooparts.c...es-side-panels
https://www.canamseadooskidooparts....nd-accessories-side-panels#:~:text=7845,$5.09
Here you go, I think. The parts page is a little hard to read. Thank Bert, he posted the page below.
https://www.canamseadooskidooparts.c...es-side-panels
https://www.canamseadooskidooparts....nd-accessories-side-panels#:~:text=7845,$5.09
Thanks. I've used JayBro's numbers to get some on order!
pegasus1300
Well-known member
Let us know how the installation went. Did you order thru your dealer?
Let us know how the installation went. Did you order thru your dealer?
Can-am parts wants around $12 shipping for $10 worth of parts so I was trying to avoid the extra cost if my local dealer could order them.
I tried contacting my local dealer, Texas Adventure Powersports, but their phone number goes straight to a recording, and they have not responded to a SMS that I sent the other day to a previously used chat with the parts manager, nor their online "Contact Us" form. We have had some very bad storms in Dallas in Dallas, so hopefully they are just "offline" and not out of business.
I'm also going to tear apart and study the current assembly to see how the front connects to the back to make I can replace it myself.
I will keep y'all updated.
My dealer Adventure PS got their storm damage fixed and phones and power restored, and called me to let me know they had the bent post in stock for $5!
Changing it out was very easy:
1. Remove the side knee panel. (YouTube has plenty of vids if you need one.)
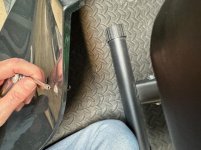
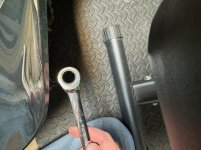
2. Use a security T20 torx bit to hold the outside chrome piece in place, use a 12mm (exact) or 1/2” box end (close enough) wrench to remove the post from the chrome cap.
3. The original post appeared to have some loctite or something white and sticky on the face that contacts the panel to prevent turning, but I didn’t have any I thought suitable so left it off. Screw the new post back onto the silver cap, making it somewhat snug, but not tight. The post wants to start crooked due to the coarse threads, but it will straighten itself as it tightens.
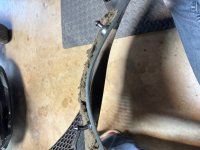
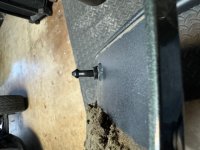
4. Use the security torx to turn the assembly so that the bent post tip is pointed as closely as possible at the straight post across from it. The bend should be parallel to the edge as shown. Holding the post still with the wrench, tighten the torx head enough to prevent the assembly from easily turning.
5. Spray some windex into the rubber grommets.
6. Slide the very front of the panel under the black cover up by the mirror, then align the bent pin directly in front of the grommet and push straight towards the middle of the bike, not forward like that portion of the panel faces. Push in the same direction that the straight pin is facing. The windex “lube” should make this easy.
7. The straight pin should be easy to push in now. Some people have posted that flexing the panel a bit helps. I did not need to do this.
8. The bottom post probably already seated itself, but if not, push it in.
9. Re attach the four T30s holding the panel on, the frunk black panel, the mirror, and the wind deflector.
Pics below. Sorry if they are rotated, trying to post on my phone.
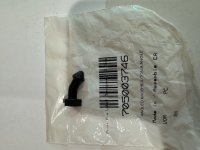 -
- 
 -
-  -
- 
Changing it out was very easy:
1. Remove the side knee panel. (YouTube has plenty of vids if you need one.)
2. Use a security T20 torx bit to hold the outside chrome piece in place, use a 12mm (exact) or 1/2” box end (close enough) wrench to remove the post from the chrome cap.
3. The original post appeared to have some loctite or something white and sticky on the face that contacts the panel to prevent turning, but I didn’t have any I thought suitable so left it off. Screw the new post back onto the silver cap, making it somewhat snug, but not tight. The post wants to start crooked due to the coarse threads, but it will straighten itself as it tightens.
4. Use the security torx to turn the assembly so that the bent post tip is pointed as closely as possible at the straight post across from it. The bend should be parallel to the edge as shown. Holding the post still with the wrench, tighten the torx head enough to prevent the assembly from easily turning.
5. Spray some windex into the rubber grommets.
6. Slide the very front of the panel under the black cover up by the mirror, then align the bent pin directly in front of the grommet and push straight towards the middle of the bike, not forward like that portion of the panel faces. Push in the same direction that the straight pin is facing. The windex “lube” should make this easy.
7. The straight pin should be easy to push in now. Some people have posted that flexing the panel a bit helps. I did not need to do this.
8. The bottom post probably already seated itself, but if not, push it in.
9. Re attach the four T30s holding the panel on, the frunk black panel, the mirror, and the wind deflector.
Pics below. Sorry if they are rotated, trying to post on my phone.
 -
- 
 -
-  -
- 
PMK
Active member
My dealer Adventure PS got their storm damage fixed and phones and power restored, and called me to let me know they had the bent post in stock for $5!
Changing it out was very easy:
1. Remove the side knee panel. (YouTube has plenty of vids if you need one.)
2. Use a security T20 torx bit to hold the outside chrome piece in place, use a 12mm (exact) or 1/2” box end (close enough) wrench to remove the post from the chrome cap.
3. The original post appeared to have some loctite or something white and sticky on the face that contacts the panel to prevent turning, but I didn’t have any I thought suitable so left it off. Screw the new post back onto the silver cap, making it somewhat snug, but not tight. The post wants to start crooked due to the coarse threads, but it will straighten itself as it tightens.
4. Use the security torx to turn the assembly so that the bent post tip is pointed as closely as possible at the straight post across from it. The bend should be parallel to the edge as shown. Holding the post still with the wrench, tighten the torx head enough to prevent the assembly from easily turning.
5. Spray some windex into the rubber grommets.
6. Slide the very front of the panel under the black cover up by the mirror, then align the bent pin directly in front of the grommet and push straight towards the middle of the bike, not forward like that portion of the panel faces. Push in the same direction that the straight pin is facing. The windex “lube” should make this easy.
7. The straight pin should be easy to push in now. Some people have posted that flexing the panel a bit helps. I did not need to do this.
8. The bottom post probably already seated itself, but if not, push it in.
9. Re attach the four T30s holding the panel on, the frunk black panel, the mirror, and the wind deflector.
Pics below. Sorry if they are rotated, trying to post on my phone.
On our 2014 RTS, those posts and the plastic side panel are keyed in proper alignment when installed correctly.
Should be a tab on the panel and the post is irregular shaped to only correctly align in one position.
On our 2014 RTS, those posts and the plastic side panel are keyed in proper alignment when installed correctly.
Should be a tab on the panel and the post is irregular shaped to only correctly align in one position.
I didn't see anything like that on my 2019. The "nut" part of the post does indeed have a flat spot that would allow for this, but no there isn't a corresponding seat or anything on the panel for it to key into. The whole post spins freely.
Similar threads
- Replies
- 12
- Views
- 523
- Replies
- 5
- Views
- 1K
- Replies
- 33
- Views
- 5K
- Replies
- 2
- Views
- 3K

